Password protect files on Windows
If you wish password protect files on Windows I advise you to create gods encrypted volumes on-the-fly, that is, to be assembled and disassembled "on the fly". If, on the other hand, you are looking for more immediate solutions to use (but potentially less secure), you can resort to creating encrypted archives. Let's examine both solutions in more detail and choose which one is best for you.
VeraCrypt
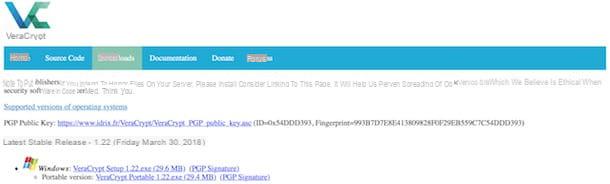
As I mentioned earlier, the safest solution to encrypt files on your PC is to create encrypted volumes, which behave exactly as if they were USB sticks or external disks to be “mounted” and “unmounted” if necessary. One of the best programs for making encrypted volumes is VeraCrypt, which is free, open source and multi-platform, i.e. available for Windows, macOS and Linux. Let's find out how to use it together.
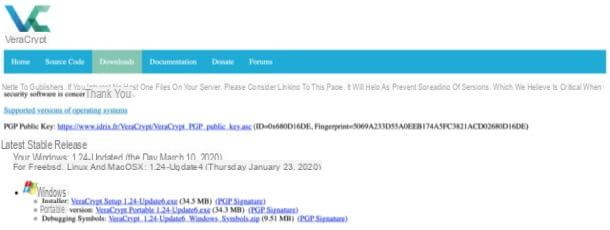
To begin with, download VeraCrypt on your PC: then connect to its official website and then click on the link VeraCrypt Setup x.xx.exe located next to the icon Windows. When the download is complete, start the file .exe you have obtained and complete the installation of the program by clicking on the button Yes, then ticking the box I accept the license terms, by clicking on the button Next twice in succession and pressing the buttons install, OK, Finish e No.
After installing and starting the program, I suggest you translate its interface into cittàn, so as to facilitate your work. Then click on the entry Language… present in the menu Settings, select the voice cityno from the list of available languages and then click on the button OK.
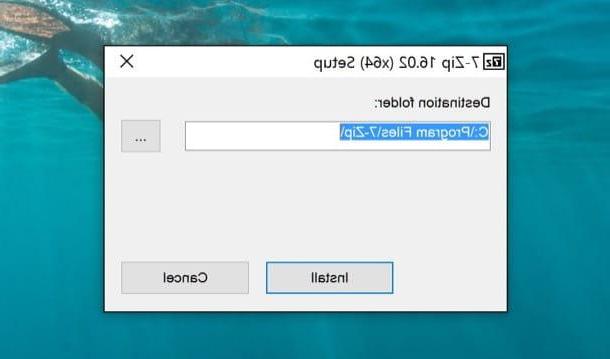
Now it's time to move on to creating the encrypted volume: click on the button Create a volume…, put the check mark on the item Create a crypto file (which actually should already be checked), presses the button NEXT, select the voice Standard VeraCrypt volume and then click the button again NEXT.

Now click on the button Select file ..., choose the folder in which to save the new volume you are creating, type its name in the appropriate text box and click on the buttons Save e NEXT. Now you will be asked to select the encoding and confusion algorithms: I recommend that you leave the default options (i.e. the encoding algorithm BEA and the confusion algorithm SHA-512) and then click on the button NEXT.
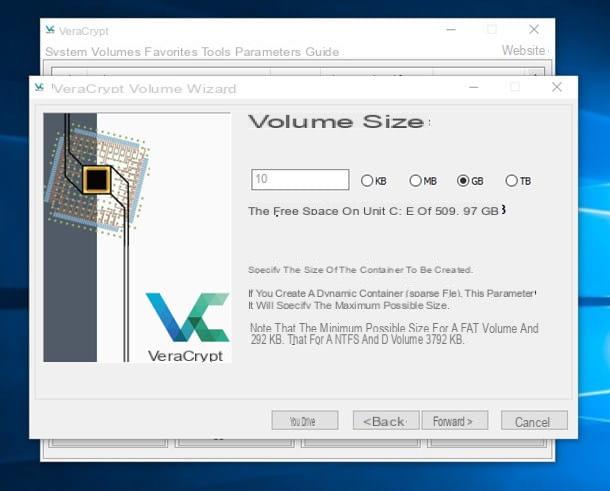
The next step is to choose the maximum size to assign to the volume. To do this, select the unit of measurement you prefer (eg. MB o GB), then enter the amount of memory in the appropriate text field (eg. 10) and, to conclude, click on the button NEXT.
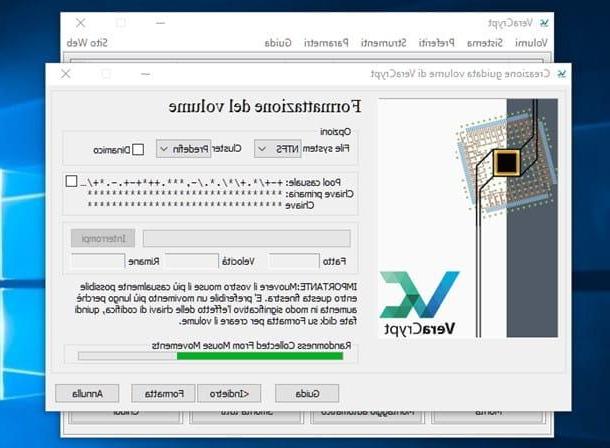
Proceed, therefore, with the creation of the secure password that you want to use to protect your volume and all the files inside it by entering it in the text fields Password e Confirmation e poi pigia sul pulsating NEXT. Now it's time to choose the file system to use for the encrypted volume you are creating. Before making this choice, however, think carefully about the type of file you want to archive so that you can opt for the best solution for you. I'll give you some examples so that you can make the best possible choice.
Let's say you want to store very heavy photos and videos; in this specific case, the file system that is best suited to your circumstances is undoubtedly NFTS. If, on the other hand, you don't have the need to store very large files, you can safely opt for the file system FAT: (which, however, has the limit of 4GB per file) or exFAT (if you want to use the volume on both Windows and macOS, without having to comply with the limit of 4GB per file). As soon as you have chosen the file system that best suits your needs, click the button Format and, finally, presses the buttons OK ed Logout.
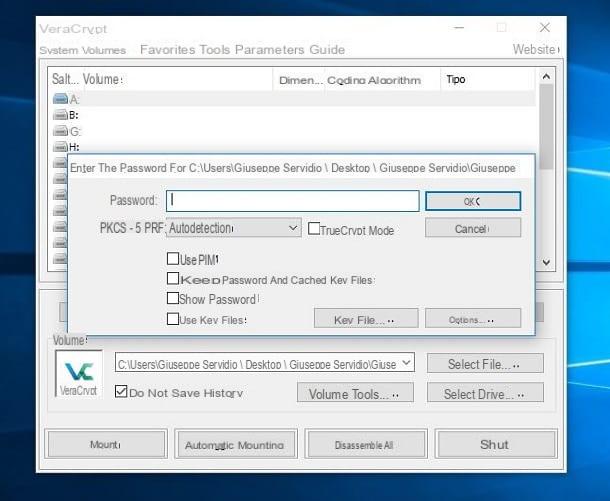
Now all you have to do is access the encrypted volume you just created. To do this, select one of the drive letters among those indicated in the main VeraCrypt window (eg. A:, B:, etc.), click on the button Select file ... located at the bottom right and select the encrypted archive you created just now.
Then click on the button Monta, type the password you set when creating the volume in the text field Password and click on the button OK. If everything went well, you will be able to see the drive icon created with VeraCrypt in the section What PC Windows 10 (if you are using older versions of the operating system, you will be able to see the drive in the sections computer o Computer resources). To manage the files located within the volume, double-click the drive letter that represents it and that's it.
Once you have finished your work on the files in the volume, remember to "unmount" it by going to the main VeraCrypt window, selecting the chosen unit and, finally, clicking on the button Disassemble. Più facile di così ?!
7-Zip
If you don't want to create encrypted volumes because it seems a bit too "complicated" as a solution (even if I have shown you otherwise), you can password protect files by creating archive compressi us 7-Zip, the very famous program that allows you to compress files that I already told you about in the tutorial dedicated to creating zip archives.
To download 7-Zip to your computer, first connect to the program's website and click on the link Download placed in correspondence with the wording .exe 64-bit x64 o .exe 32-bit x86, based on the version of Windows installed on your PC. Once the download is complete, start the file .exe downloaded and click on the buttons Yes, install e Close but I will complete the setup.
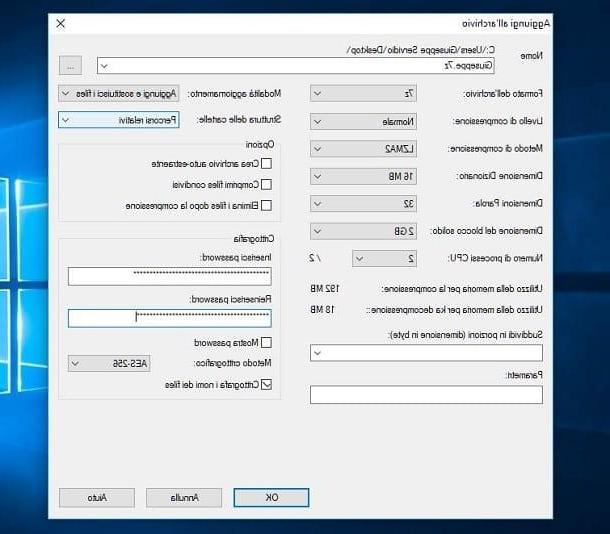
At this point, locate the file you want to protect with a password, right-click on its icon and, in the menu that opens, select the item 7-Zip> Add to archive .... In the 7-Zip main window, select 7z o zip from the menu Archive format (the other available options do not allow you to encrypt files); enter the password you intend to use to protect the file in the text fields Enter password e Re-enter password, select the voice AES-256 from the menu Crittographic method, put the check mark on the item Crittography and nomi dei files and then click on the button OK.
Now you can finally open the encrypted archive you just created: double-click on the archive, enter the password to extract it and check that the file you encrypted is inside it. Finally, permanently delete the "original" file by holding down the key Shift, by right clicking on the icon of the file to be deleted, then selecting the item Delete from the menu that opens and finally clicking on the button Yes to complete the procedure.
Please note: if you want to protect more than one file using the method described above, put the files you want to encrypt in a folder and then follow the procedure just described to create an encrypted compressed archive.
Password protect files on macOS

Also su MacOS you can resort to VeraCrypt to encrypt files, as this program is also available for the computers of the bitten apple. If, on the other hand, you don't want to resort to third-party solutions to password protect files, you can use the tool Disk Utility, which is present by default on all Macs. Let's find out how to best use both solutions and then use the one that seems best suited to your needs.
Disk Utility
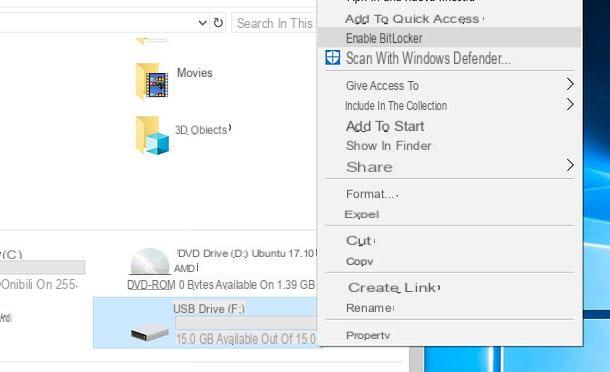
To encrypt files with Disk Utility, you must first launch the latter on macOS. Go, therefore, to the Launchpad (the rocket icon on the Dock), open the folder Other and then click the icon of Disk Utility (the one showing a hard disk with a stethoscope). Now you have to proceed with the creation of an encrypted volume in which you will then go to save all the files and folders to be password protected.
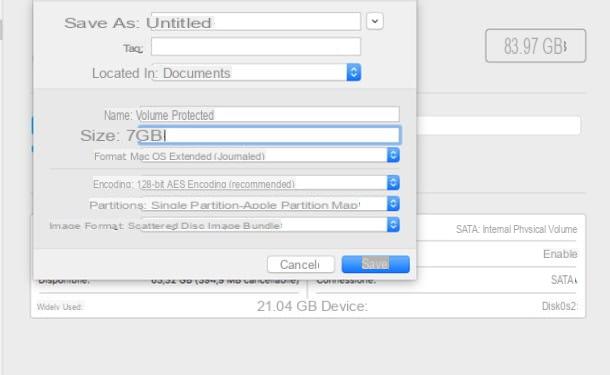
Then click on the item Fillet present in the menu bar (top left), click items New Image> Empty Image ... and then use the procedure described below to complete the creation of the volume: in the fields Save as e Your name, write the name you want to give to the volume; click on the drop-down menu located in to select the location to save the volume; indicates in the field Sizes the size you want to assign to it; select the item Mac OS extended (journaled) give menu to tendin Size; choose the item Single Partition - Apple Partition Map from the menu Partitions; select the item Sparse Bundle disk image from the menu Image format and then click on the entry 128-bit AES from the menu Encode.
At this point, type the password with which to protect the volume in the text fields Password e Verifica and then click the buttons Choose, Save e end. Then go to the location where you saved the encrypted file, open it by double clicking on it, type in the appropriate box the Password you set up earlier and click the button OK.
As you can see, the encrypted volume will be opened in Finder and you can manage it exactly as you would with an external hard drive or a pendrive. Whenever you have finished using it, "unmount" it by right clicking on its icon on the desktop and selecting the item Eject from the menu that opens, or by clicking on the symbol (⏏︎) area of arrow pointing up located in the sidebar of the Finder (at the encrypted volume you want to eject).
VeraCrypt
If you wish to resort to VeraCrypt to create encrypted volumes on macOS, all you have to do is download the program and then use it following the same steps I indicated in the paragraph dedicated to the Windows version of the software. Being a multi-platform program, in fact, the VeraCrypt interface is identical both on Windows and on macOS (apart from the language which, unfortunately, on macOS cannot be translated into cittàn).
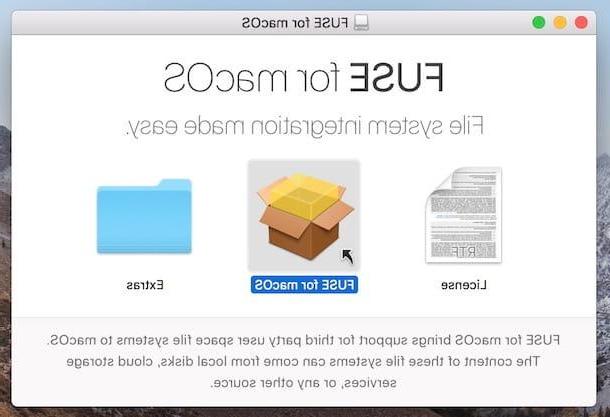
Before installing VeraCrypt on macOS, however, you need to install FUSE, a component necessary for the proper functioning of the software on the Apple platform. To download FUSE, click here to link directly to its download page and click on the icon FUSE for macOS xxx placed at the top.
When the download is complete, open the file you downloaded, double-click the icon FUSE for macOSclick on your button Continue three consecutive times and then on Accept, Continue e Install. Then type in the Mac administration password as soon as you are asked to do so, press the button Install software and then on the buttons OK, Open Security & Privacy System Preferences, Allow, Close e Move present in the FUSE installation window.
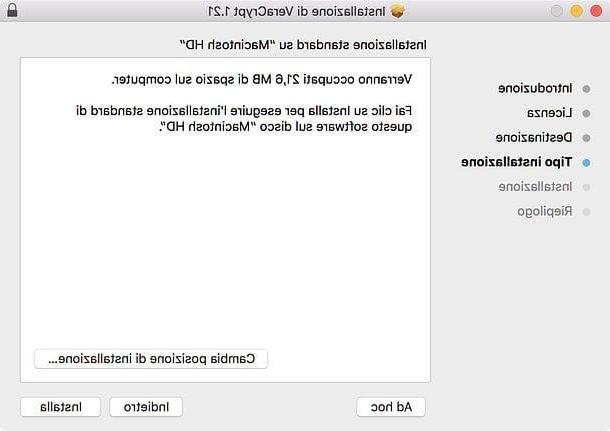
Now, you can finally move on to installing VeraCrypt. To do this, connected to the program's website, click on the link VeraCrypt_x.xx.dmg and wait for the file to download. Then open the file you downloaded, double click on the icon VeraCrypt_Installer.pkg, click the button twice consecutively Continue, Then Accept e Install. Finally, type your Mac password in the appropriate text field and press the buttons Install software, Close e Move.
Compliments! You have just finished installing VeraCrypt. All you have to do is start it and use it by following the steps I explained to you in the chapter dedicated to the Windows version of the program.
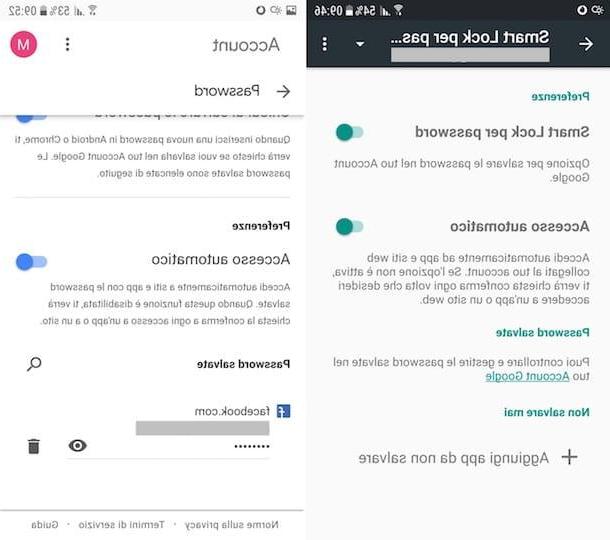
Password protect files on Android
On your smartphone or tablet Android Are there any files you would like to password protect? You can do this simply by using one of the many file managers that offer file encryption functionality.
One of the best file managers on the market is without doubt Solid Explorer: it costs € 1,99 but it is possible to test all its functions (including that relating to file encryption) for a trial period of 14 days, at the end of which you can choose whether or not to buy the app. After installing and starting Solid Explorer on your device, press the button Following to browse the cards describing the main features, put the check mark on the item I accept the license agreement and tap on the item Done.
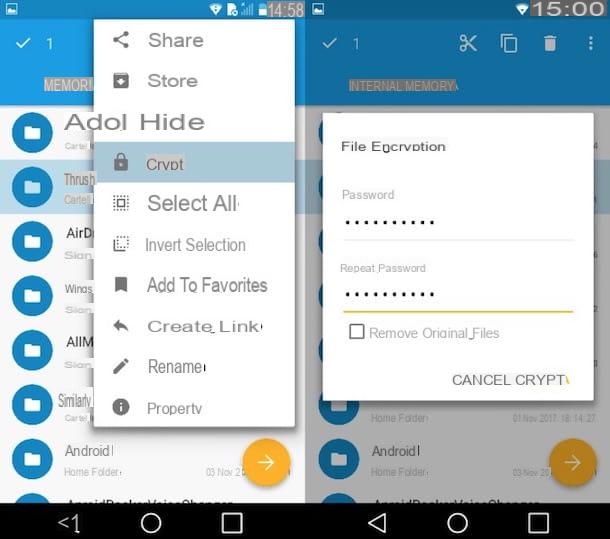
Therefore, grant the app the necessary permissions to use all its features, locate the file you want to encrypt, make a long tap on it and then press the button (⋮) located at the top right. Now, you just have to press on the item Crypt from the menu that opens, enter the password to be used to protect the selected file in the text fields Password e Repeat the password and, finally, tap on the item Crypt, so as to save the changes, and repeat all the steps for each file you want to protect.
Mission accomplished! From this moment on, only you will be able to access the encrypted files using the password you set earlier. If you are interested in learning more about the topic of protecting files on Android, please read the guide I published on my blog.
Password protect files on iOS
If you want to protect the files on your device iOS, unfortunately you cannot count on solutions like the one I mentioned in the previous chapter, as they are only available on Android.
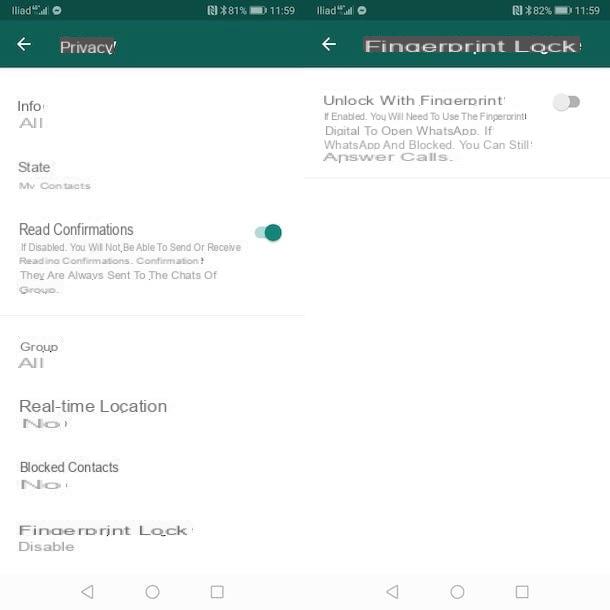
However, you can use some applications, such as the famous Private Photo Vault, to insert photos and videos into a sort of “virtual container” to be protected with a password. To block access to apps with a password, however, you will need to jailbreak your iPhone or iPhone; but I do not recommend that you do so, as this procedure could invalidate the warranty.
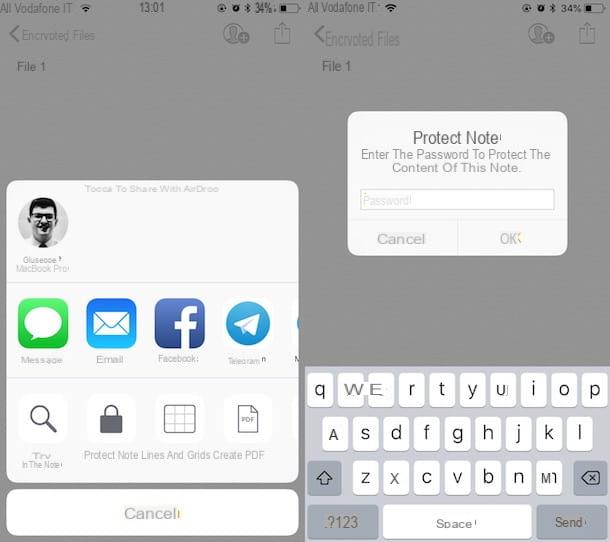
As for the notes, however, you can use the encryption function present in the app Notes Apple (to invoke this function, open a note you want to protect, tap the button Share> Protect Note, enter one in the appropriate text fields Password it's a suggestion to remember it and then tap on the item end).
If you want more information on how to hide files on iOS and how to hide apps on iOS, read the in-depth guides that I just linked to you.
Come protect file with password